
Ender 3 Pro Customising and Compiling Marlin Firmware
- Michael Mellor
- Feb 3, 2022
- 3 min read
One of the marlin updates we made to our Ender 3s - our logo on the startup screen.

Disclaimers (aka The Fun Police)
Some settings can be dangerous, like allowing higher temperatures.
If you blow up your printer or burn down your office/house, you were warned that changing settings can be dangerous.
Prerequisites
Microsoft Visual Studio Code - https://code.visualstudio.com/
Install the basic VS Code package and ensure that you select:
“Add to Path" during setup
On first run of VS - Select the following build platforms to install:
PlatformIO
C/C++
Getting the code
Download Marlin firmware: https://marlinfw.org/meta/download/
Download the Ender 3 Pro Configuration that matches your motherboard: https://github.com/MarlinFirmware/Configurations/tree/release-2.0.9.3/config/examples/Creality/Ender-3%20Pro
TIP: to save a file when looking at github in a web browser, open the file then right click on the "Raw" button. Select "save link as…"
Getting the project started in VS Code
Unzip the Marlin firmware to a folder that will serve as your Project folder.
(such as Documents\VS Projects\Firmware\)
Place the configuration files into the “Marlin” subfolder of the Project
(e.g. Documents\VS Projects\Firmware\Marlin\).
This will overwrite the default configuration files.
Open Visual Studio Code and choose the PlatformIO tab on the left side:

Click “Open Project” and navigate to the folder you unzipped before.
There should be a platformio.ini file in this folder.
Click “Open [Firmware]” - [Firmware] will be the name of the folder you unzipped.
Now open the platformio.ini file

For 4.2.2 and 4.2.7 boards, you want to change the default_envs to:
default_envs = STM32F103RET6_creality
Save platformio.ini and close it. PlatformIO should now start "Rebuilding Intellisense Index" in the background while you make some tweaks to the config.
First up, let’s double check the correct board is selected selected in Configuration.h
#define MOTHERBOARD BOARD_CREALITY_V4 //Use this for 4.2.2
#define MOTHERBOARD BOARD_CREALITY_V427 //Use this for 4.2.7
Before we get down to the config tweaks, a big tip here is to try to compile. It takes a lot longer the first time around as it downloads more libraries and compiles them.
Look for the Tick on the bottom left of the status bar

The default config has FAN_SOFT_PWM disabled which crashes the compile.
If you see an error related to this, use search to find that line in Configuration.h (line 2853 at the time of writing) and uncomment it.
Once compiled, you will find the firmware file in your project folder under \.pio\build\STM32F103RET6_creality\
Copy it to your microsd, pop it in your printer and reboot.
Now the fun stuff!
Some of the settings we have tweaked for our machines are below, jump into the corresponding file and use the find tool (Ctrl+F) to search for the place in code.
Most of the safe settings are in Configuration.h and the more advanced settings in Configuration_adv.h
Tweaking the firmware can add significant heft to the firmware size. Depending on your board and how many features you enable, you can run out of program memory. Towards the end of the compile log you will see a table of space used in RAM (64k) and flash (512k). PlatformIO also has an inspect tool that shows where the space is being taken up, but it takes an incredibly long time.
Configuration.h
Setting | What it does |
#define MEDIA_MENU_AT_TOP 1 | Show the SD card menu at the top. |
#define CUSTOM_MACHINE_NAME | Set a name that displays on the home screen |
Heater 0 through 7, sets a maximum temperature for the extruder. The actual temperature you can select will be 15deg lower than this value. | |
#define PID_EDIT_MENU
| Enables PID tuning menu items. This takes up extra PROGMEM. You can run M403 autotune via terminal (octoprint or serial terminal) then set the K values using the PIDTEMP section of the Conf without adding the autotuning menu. |
#define X_DRIVER_TYPE | Tune stepper driver timing for different types of stepper drivers |
Bed leveling is far too much to explain here, but this is what you’re looking for to enable it. | |
Change the preheat configurations that are baked into the firmware. Up to 5 materials are supported. You may need to clear the printer settings after the firmware update for the new values to take hold. |
Configuration_adv.h
Setting | What it does |
#define HOST_ACTION_COMMANDS | Enable host support for Octoprint. Allows you to pause Octoprint from the printer. |
#define BOOTSCREEN_TIMEOUT 4000 | The total bootscreen time. Make sure that if you set the custom bootscreen time that you still allow time for Marlin’s screen. They put a lot of work in, so credit where it’s due! |
#define SHOW_REMAINING_TIME | This section allows for more informative progress displays. If you use time remaining via Post processing in Cura, this is less helpful. |
#define SD_REPRINT_LAST_SELECTED_FILE
| On a production 3D printer, you can be printing the same file over and over. This setting keeps the menu ready to do just that! |
#define CUSTOM_MENU_MAIN | This section allows you to add GCode to a custom submenu. Default entries include Home, Preheat for materials. Use the GCode below to create an interactive Position guide for manual Tramming of the bed. |
#define MAIN_MENU_ITEM_4_DESC "Bed Adjust Positions" #define MAIN_MENU_ITEM_4_GCODE "G90 \nG28 \nM0 \nG1 Z5 \nG1 X32 Y36 F3000 \nG1 Z0 \nM0 \nG1 Z5 \nG1 X32 Y206 F3000 \nG1 Z0 \nM0 \nG1 Z5 \nG1 X202 Y206 F3000 \nG1 Z0 \nM0 \nG1 Z5 \nG1 X202 Y36 F3000 \nG1 Z0 \nM0 \nG1 Z5 \nG1 X117 Y121 F3000 \nG1 Z0 \nM0 \nG28 \nM84" | |
Changing the boot screen
Open the _Bootscreen.h file and read the comment block at the top.
You can upload an image file to the Marlin tool webpage to convert it to the code required for this file: https://marlinfw.org/tools/u8glib/converter.html
You may need to resize your image to 128pixels width or less.
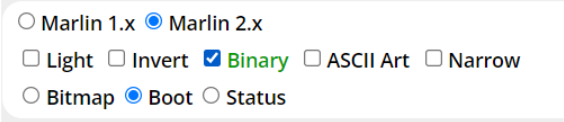
Set the tool to generate Marlin 2, Binary, Boot then copy and paste the code back into your _Bootscreen.h file.
You may want to keep the following code in the _Bootscreen.h file:
#define CUSTOM_BOOTSCREEN_TIMEOUT 2500
#define CUSTOM_BOOTSCREEN_INVERTED
This keeps the custom bootscreen up for 2.5 seconds and inverts the LCD.
Other tweaks:
_Statusscreen.h defines the image for the “Info screen” or home screen. This is “Ender-3 Pro” by default. Small images work best here, 40x16px, you want to see the temps right?
Marlin\src\lcd\menu\menu_temperature.cpp can be tweaked to move the preheat items up to the top of the menu. I’d recommend using the custom menu in Conf_adv instead as modifying the Marlin codebase will break when updating to a newer version of Marlin.
Marlin\src\lcd\menu\menu_main.cpp can be tweaked to move the custom menu to the top. Again this will break when Marlin is updated, but it’s worth the effort if you are using the custom menu a lot.
Get Creative!
As we said in the beginning, don't get too crazy with extending your machines capabilities unless you are making hardware changes to accommodate them.
Our main goal was to add a little glam to the machines but also to improve efficiencies by making custom menu items for PETG preheat, bed levelling procedure and also adding some custom audio alerts for end of print and other such niceties that just make managing a dozen machines and 50 product prints that little bit easier!


Comments